
To install more useful third-party app on your iPhone, iPad or iPod touch, you may have to jailbreak your iDevice. However, it takes a possible risk that your iOS data may get lost if the jailbreak fails. You may wonder if there’s any way for you to recover your lost data on your iPhone, iPad, etc. Fortunately, there’s an incredible data recovering tool, iPhone Data Recovery, which specializes in restoring lost iPhone 6 content. Let’s learn how this legend data recovering software works.
iPhone Data Recovery works better than other software of the same kind. It provides you with three recovery modes, “to scan your iOS directly for lost data”, “recover from iTunes backup” and “recover from iCloud backup”. With it, you can recover around 16 types of iOS data including the text files and the media files. For example, contacts, notes, camera roll, messages, and so forth.
You can download this awesome iPhone Data Recovery on your computer and read the tutorials below to see how excellent it works.
Now download Phone Transfer on your computer and keep reading.


Tutorial (The passage will be separated into 3 parts as follow:)
Recover Lost iPhone 6 Data Directly from iOS
Recover Previous Content by Retrieving from iTunes Backup File
Restore iPhone 6 Files from iCloud Backup File
1:Recover Lost iPhone Data Directly from iOS
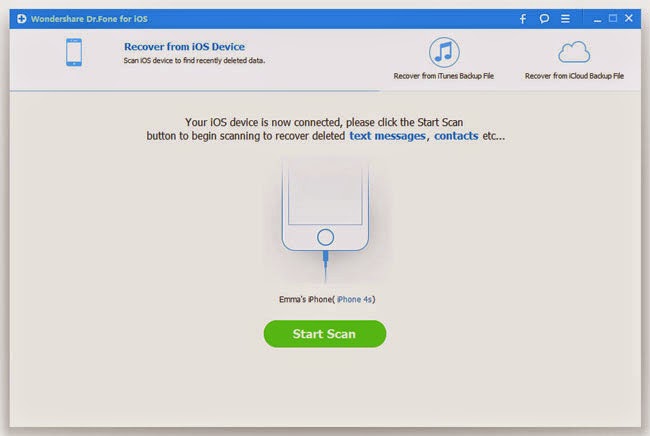
You are allowed to scan your iOS device, like iPhone 6/5S/5C/5/4S/4, iPad 2/1/mini 2/mini/ iPad with Retina display/The new iPad, and so on, with the help of iPhone Data Recovery. It helps if you install this distinctive recovering tool and have your iPhone/iPad connected to the computer.
Step1:Connect your iPhone 6 to the Computer
After operating the installation, you can connect your iPhone 6 to the computer via USB cable. After your device detected, you can see the interface as below.
Step2:Enter DFU Mode to Scan Your Device
Before having your iDevice scanned, you should make sure that you have entered the DFU mode of your device. If you have entered the DFU mode, you can just skip and move on. If you haven’t entered yet, you can read the passage below.
To enter DFU mode, you should:
1) Hold your iPhone/iPad and click "Start" in the interface of iPhone Data Recovery.
2) Hold "Power" and "Home" buttons simultaneously for exactly 10 seconds. The Software will count down for you.
3) When 10 seconds passed, release the "Power" button right away, but not the "Home" button. After another 10 seconds, you'll be informed that you've successfully entered the DFU mode and you can release the "Home" button now.After that, the software will begin scan your iPhone automatically and within few seconds, all the data will be displayed in the interface as below.
 Step3:Preview and Recover Contents Selectively
Since all your iPhone data is displayed in the interface of this incredible recovering program, you can preview them one by one according to categories, like contacts, messages, message attachments, call history, camera roll, photo stream, photo library, calendar, notes, reminders, voice memos and safari bookmark and so forth. You can preview the detail information of the text messages and contacts like the phone number, date and sending time, etc.
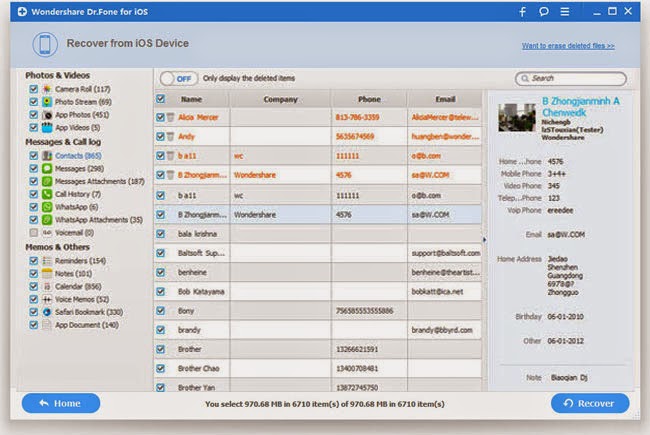
If you want to retrieve all the iPhone data, you can directly click "Recover". If you want to recover some of them, you can tick the other catalogue off and remain the ones you want to recover.
2 Recover Previous Content by Retrieving from iTunes Backup File
In this recovery mode, you can recover your iOS lost data from iTunes backup file. No matter you lost your iPhone data in what situation, deleted accidentally, fail while jailbreaking, broken, stolen, screen smash, etc. you can easily recover them back to your iPhone/iPad.
Step1:Pick up the Latest iTunes Backup File
After launching, choose the second recovering mode, you will see the following screenshot.

As you can see in the picture, if you have do iTunes backup with more than one device, the program will list all these files for you, choose the correct one and the latest one for your iPhone and iPad. Then, click "Start Scan".
Step 2:Preview and Restore Critical Previous Data
After the scanning, all the iOS content that stored in your iTunes backup file will be listed according to categories. You are facilitated to preview them one after another.

You can also choose "Only display the deleted items" to neglect the existing data and preview the lost data only. After choosing all iPhone data you want, you can easily get them back by simply one click.
You can also choose to recover from iCloud backup. To choose this method, you should make sure that you have an iCloud account and have done backup with it.
3 Restore iPhone 6 Files from iCloud Backup File
Recover Previous Content by Retrieving from iTunes Backup File
Restore iPhone 6 Files from iCloud Backup File
1:Recover Lost iPhone Data Directly from iOS
You are allowed to scan your iOS device, like iPhone 6/5S/5C/5/4S/4, iPad 2/1/mini 2/mini/ iPad with Retina display/The new iPad, and so on, with the help of iPhone Data Recovery. It helps if you install this distinctive recovering tool and have your iPhone/iPad connected to the computer.
Step1:Connect your iPhone 6 to the Computer
After operating the installation, you can connect your iPhone 6 to the computer via USB cable. After your device detected, you can see the interface as below.
Step2:Enter DFU Mode to Scan Your Device
Before having your iDevice scanned, you should make sure that you have entered the DFU mode of your device. If you have entered the DFU mode, you can just skip and move on. If you haven’t entered yet, you can read the passage below.
To enter DFU mode, you should:
1) Hold your iPhone/iPad and click "Start" in the interface of iPhone Data Recovery.
2) Hold "Power" and "Home" buttons simultaneously for exactly 10 seconds. The Software will count down for you.
3) When 10 seconds passed, release the "Power" button right away, but not the "Home" button. After another 10 seconds, you'll be informed that you've successfully entered the DFU mode and you can release the "Home" button now.After that, the software will begin scan your iPhone automatically and within few seconds, all the data will be displayed in the interface as below.
Since all your iPhone data is displayed in the interface of this incredible recovering program, you can preview them one by one according to categories, like contacts, messages, message attachments, call history, camera roll, photo stream, photo library, calendar, notes, reminders, voice memos and safari bookmark and so forth. You can preview the detail information of the text messages and contacts like the phone number, date and sending time, etc.
If you want to retrieve all the iPhone data, you can directly click "Recover". If you want to recover some of them, you can tick the other catalogue off and remain the ones you want to recover.
2 Recover Previous Content by Retrieving from iTunes Backup File
In this recovery mode, you can recover your iOS lost data from iTunes backup file. No matter you lost your iPhone data in what situation, deleted accidentally, fail while jailbreaking, broken, stolen, screen smash, etc. you can easily recover them back to your iPhone/iPad.
Step1:Pick up the Latest iTunes Backup File
After launching, choose the second recovering mode, you will see the following screenshot.
As you can see in the picture, if you have do iTunes backup with more than one device, the program will list all these files for you, choose the correct one and the latest one for your iPhone and iPad. Then, click "Start Scan".
Step 2:Preview and Restore Critical Previous Data
After the scanning, all the iOS content that stored in your iTunes backup file will be listed according to categories. You are facilitated to preview them one after another.
You can also choose "Only display the deleted items" to neglect the existing data and preview the lost data only. After choosing all iPhone data you want, you can easily get them back by simply one click.
You can also choose to recover from iCloud backup. To choose this method, you should make sure that you have an iCloud account and have done backup with it.
Step1:Choose the Recovery Mode and Sign in your iCloud
Launch iPhone Data Recovery and choose the third mode. You will see the following window.

After signing in, you will see the iCloud backup files of your iCloud account. Choose the latest one and click the download button to download them.
Then, you can see the iCloud content. Click the scan button to analyze iCloud backup. Don’t worry about wasting time because it won’t last you long.

After the scan, you can check almost all data in your iCloud backup. Then you choose the item you want and click on the Recover button to save them on your PC.

More resource reference:
Recover Lost Data from iPhone 6How to Recover Lost Contacts from iPhone After Upgrading to iOS 9
Restore Deleted iPhone Photos Without Backup
Recover iPhone 5S/6/6 Plus Photos After iOS 9 Upgrade